
Mark the Support Before I Do (Chart Markup Exercise)
Support levels aren't handed to you. You have to find them. This markup exercise trains you to identify, draw, and grade support levels on real charts before seeing where price reacts, which is the only way to develop the skill that matters in live trading.

Learning Path Stage 2: Reading Charts
Learning Level 3: Application
Primary Learning Objective
By the end of this lesson, you will be able to objectively filter out market noise on a 4H or daily chart by identifying, drawing as zones, and grading (A through D) the 3 to 5 most structurally significant support levels over a 6 to 12-month period.
This exercise assumes you already have a working framework for finding levels in the first place. If you haven't read "How to Draw Support and Resistance" yet, start there. The "Look Left" method and the habit of drawing zones instead of lines are what you will be applying below.
What Support Actually Is
Support is where buyers have previously overwhelmed sellers. It is the exact area where the balance of power shifted from sellers pushing price down to buyers absorbing that pressure and reversing the move. Price tends to return to these levels because they represent areas where many participants have established positions, placed stops, and formed strong psychological expectations.
There is no chart magic or secret mystery here. Enough participants watch the exact same levels, and their collective behavior at those levels creates the reactions that make the lines work. It is completely self-fulfilling.
The practical takeaway is straightforward. Levels with more historical reactions on higher timeframes are watched by more participants, meaning they tend to produce stronger reactions. Levels with fewer reactions or those buried on lower timeframes are ignored by the broader market, resulting in weaker and less consistent behavior.
Reality Check: If a level is only visible on your 1-minute chart, you aren't trading market structure. You are trading noise.
Before You Draw: What Makes a Level Valid
Before you start throwing lines on your screen, a valid support level requires a few strict minimums:
At least two significant touches: You need two price reactions at approximately the same level. The more touches you find, the more significant the level becomes. Each touch confirms that participants at that price were meaningful.
A meaningful reaction at each touch: The reaction should be highly visible, such as a notable bounce, a sharp reversal, or clear deceleration. A touch where price barely paused before slicing right through is not a valid touch.
Clarity without overreach: The level should be completely identifiable without stretching to make it fit. If you find yourself squinting at your screen trying to force price to sort of touch the level, it is probably a phantom line.
Timeframe appropriateness: A level on the daily chart completely outweighs one on the 15-minute chart. When you are marking support for context on a 4H chart, treat daily levels and above as your primary reference points.
The Exercise
Open up a chart on TradingView. Choose any instrument you like on the 4H or daily timeframe, then scroll back to see roughly 6 to 12 months of price history. This should give you about 200 to 400 candles to work with.
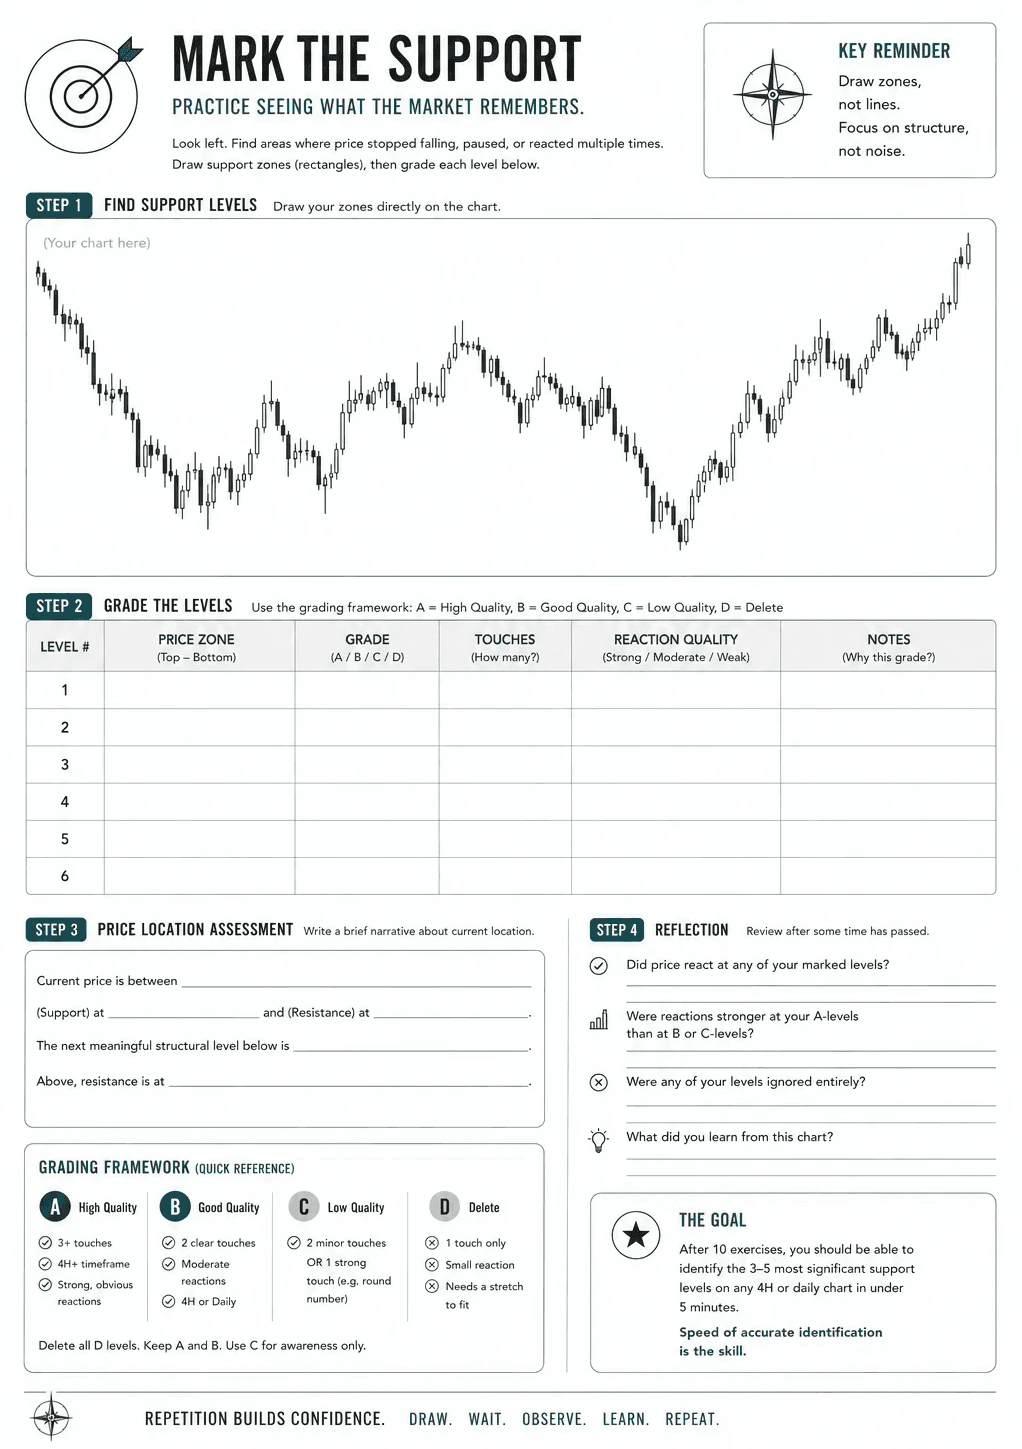
Step 1: Find Support Levels (10-15 minutes)
Starting from the left side of your visible chart and moving right, look for price areas where:
Price stopped falling and reversed.
Price paused significantly before continuing, meaning consolidation zones definitely count.
Price returned and reacted multiple times.
Draw horizontal rectangles to represent zones at these areas. Annotate each one with a brief note like "strong support, 3 touches" or "former support, now possible resistance, broken 3 months ago."
Step 2: Grade the Levels (5 minutes)
For each level you have drawn, assign a strict grade:
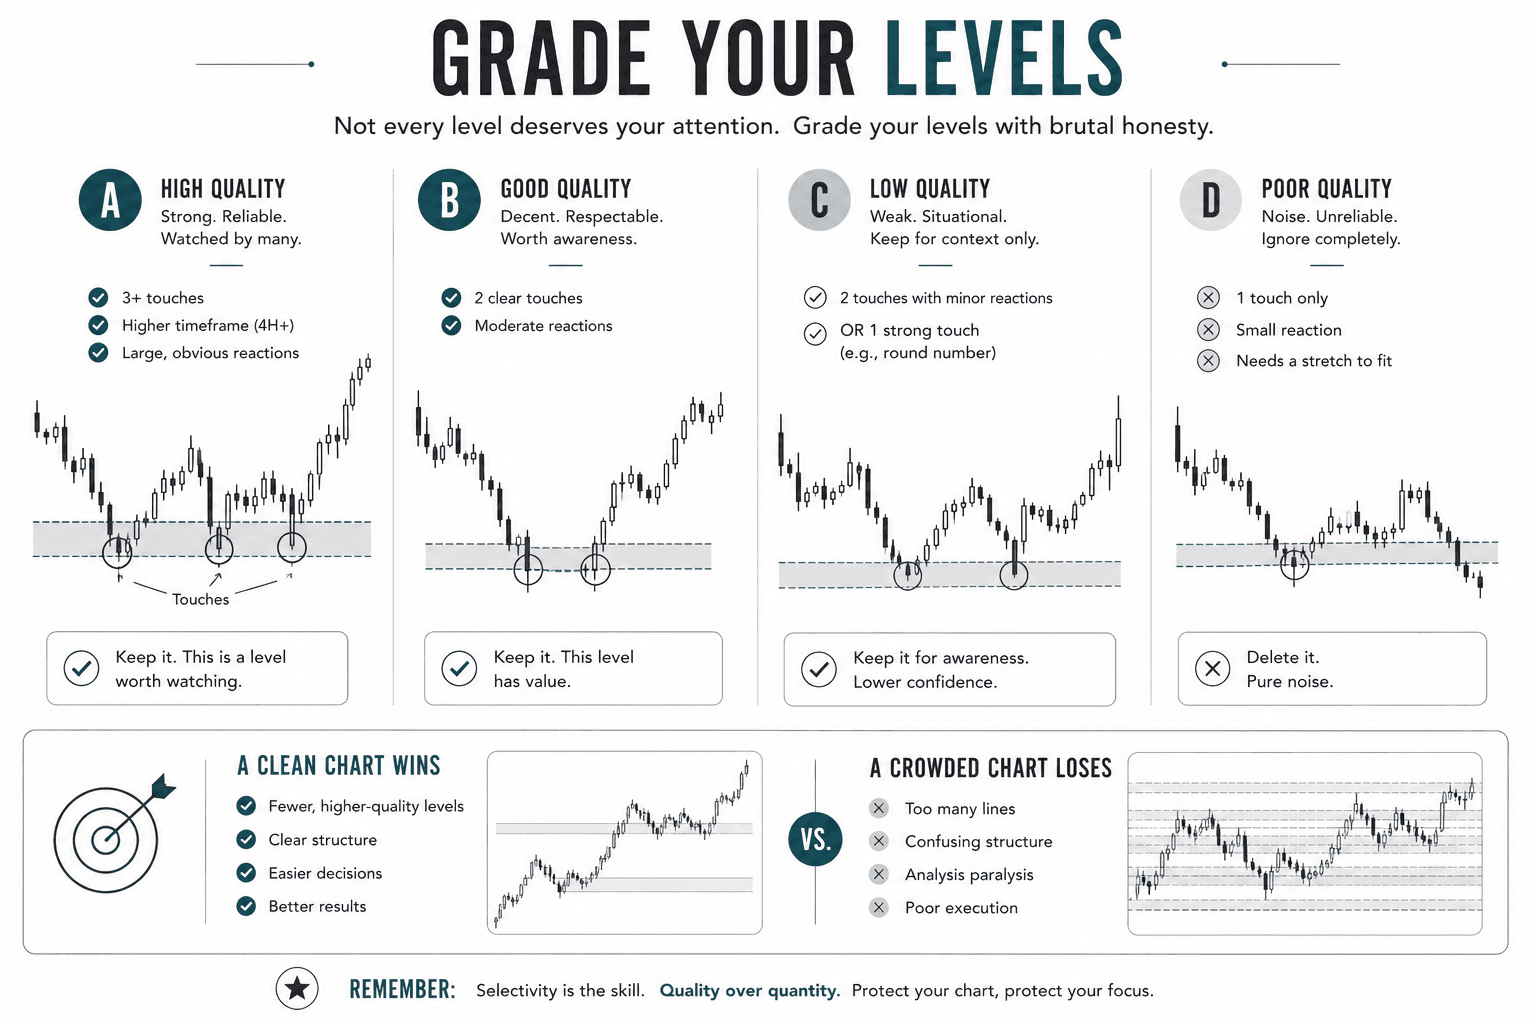
A: Multiple touches (3+), on a timeframe of 4H or higher, featuring large reactions that are clear and unambiguous.
B: Two clear touches with moderate reactions on the 4H or daily chart.
C: Two touches with minor reactions, or one single strong touch with clear psychological significance like a major round number.
D: One touch, a small reaction, or a level that requires a very generous interpretation.
Now, delete all of your D-grade levels. They are pure noise. Your final chart should consist primarily of A and B levels, with a few C-grade levels left strictly for overall awareness.
Step 3: Price Location Assessment (5 minutes)
Look at where the current price is sitting relative to your marked levels:
Above a significant support? That support is your floor, which is the level where buyers are expected to step in on a pullback.
Below a prior support that is now likely resistance? That level is your ceiling, meaning it is where sellers are expected to defend on a bounce.
Sitting at a support level right now? This is a potentially active decision point.
Write a brief narrative for yourself: "Current price is between Level A support at [price] and Level B resistance at [price]. The next meaningful structural level below is [price]. Above, resistance is at [price]."
Step 4: Verify Against Your Prediction (Next Session or Next Day)
Come back to the chart after some time has passed and grade your own homework:
Did price actually react at any of your marked levels?
Were the reactions noticeably stronger at your A-grade levels than your B or C-grade levels?
Were any of your drawn levels ignored entirely by the market?
This feedback loop of drawing levels, waiting for price to approach them, and observing the live reaction is the ultimate practice mechanism. Over many repetitions, it calibrates your eyes and builds actual confidence in your levels.
Common Mistakes to Correct
Drawing too many levels: A chart covered in dozens of horizontal lines is completely useless. Selectivity is the entire skill. If your chart looks like a spiderweb, you have failed the exercise.
Drawing levels without context: A level from two years ago that has not been tested recently is irrelevant to current market participants. Prioritize levels that have been touched within a relevant recent timeframe for the asset you are trading.
Using only swing lows: Support is not just swing lows. It includes consolidation zones, prior resistance that has flipped into support, and round numbers with significant historical attention. Expand your search criteria.
Treating levels as exact lines: If you draw a level at 1.1050 and price bounces from 1.1043, your level was not wrong. It simply means price reached the zone.
The Benchmark
After completing 10 markup exercises across different instruments and timeframes, you should be able to cleanly identify the 3 to 5 most significant support levels on any 4H or daily chart in under 5 minutes.
If identification is still taking you 15 minutes or more, your practice volume needs to increase. If you are consistently marking 15 or more levels per chart, your filter needs to tighten up. Speed of accurate identification, not exhaustive coverage, is the exact skill you are trying to develop.
Success Criteria
You will know you have successfully mastered this lesson when you can look at any fresh 4H or daily chart and confidently do the following:
Isolate Areas of Value: Draw horizontal rectangles (zones) instead of single lines, accurately factoring in a margin of 10 to 20 pips (or 0.3% to 0.5% of price) to capture historical buyer reactions.
Apply the Grading Hierarchy: Ruthlessly delete all "D-grade" levels (single touches or minor wiggles) to keep your chart clean and uncluttered.
Formulate a Price Narrative: Write a clear, 3-point situational assessment pinpointing exactly where the current price sits relative to your active floor (support), ceiling (resistance), and the next major structural breakout level.
Pass the Speed Benchmark: Complete the entire mapping, grading, and filtering process for any instrument in under 5 minutes.
Common Misconception
Marking more levels means more thorough analysis.
The Truth: In practice, a chart with fifteen lines on it just means every price is "near a level," which makes the exercise useless. Marking fewer levels, and grading them honestly, is the actual skill.
FAQ's
Q: What if I see too many potential support levels on a chart?
Q: Is a level that was support and then broke still relevant?
Q: How precise should a support level be: an exact price or a zone?
Table of Contents
About Me

Krista Weber
After a career as a VP of UX and EdTech executive, I retired early—and quickly realized the traditional world of trading education is fundamentally broken.
As someone with a Master’s in HCI who specialized in the design of e-learning systems, I saw a massive gap: beginners aren't failing because trading is impossible; they’re failing due to massive cognitive overload and terrible instructional design.
This site bridges that gap. I’m applying the principles of learning science, systems thinking, and minimalist UX to strip away the market noise and teach trading the way it actually should be taught.
Stay in Touch
Some of the pages on my travel blog contain affiliate links. Whenever you buy something through one of these links, I get a small commission at no extra cost to you. As an affiliate, I only recommend products and services that I feel are high quality and helpful to my readers. Thanks for your support.
Read More

Open almost any trading platform and you'll see EUR/USD sitting next to XAU/USD, NQ, ES, and a dozen CFDs on stocks you've heard of. They all show up as candlesticks moving left to right, which quietly implies they're all the same kind of thing. They aren't. Before going deeper into any one of them, it's worth drawing the map.
Updated on Sep 6, 2026

Futures are standardized contracts tied to defined specifications and a future settlement date. They can look complex at first, but the mechanics become much clearer once you know what the contract specification controls. Here's what you actually need to know.
Updated on Sep 6, 2026

CFDs appear everywhere in retail trading – but most new traders couldn't explain exactly what they are or why that matters. Here's a plain-language breakdown, including the parts that most introductions skip.
Updated on Sep 6, 2026